Customizing the AddThis Widget
AddThis.com provides a nice social sharing widget that combines many popular social site sharing tools into a single widget. As of mojoPortal version 2.3.9.3 we have built in support for the AddThis widget in the blog feature and you can also use it in the layout.master file of a skin to easily add sharing links to all pages in your site. Note that we also have an older AddThis button that has been included in mojoPortal for a long time but it is now considered deprecated in favor of the newer widget.
To get started you should sign up for a free account at AddThis.com, after doing that you can configure which sharing services you want to include in your widget from their administrative page, then add your account id in mojoPortal Site Settigns under the API Keys tab.
To use the new AddThis widget int he blog feature, go into the settings and uncheck the box for "Hide AddThis", and you can disable the individual items for things like Facebook and Twitter since they will be part of the AddThis widget.
You can add the AddThis widget into your layout.master file of your skin like this:
<portal:AddThisWidget ID="adthis" runat="server" />
you can optionally wrap it in a div with a CSS class name if you need to position it, however positioning can also be controlled by theme.skin settings.
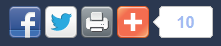
By default the widget looks something like this:
but the sharing links are controlled partially from your AddThis account settings and can be customized further from the theme.skin file in your skin folder.
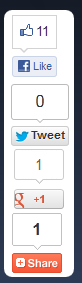
For example if you put the widget in your layout.master file, you can make it vertical and in a fixed position on the left side of the page, by putting this in the theme.skin file:
<portal:AddThisWidget runat="server"
ToolbarMarkup="<div class='addthis_toolbox addthis_floating_style addthis_counter_style' style='left:5px;top:250px;'><a class='addthis_button_facebook_like' fb:like:layout='box_count'></a><a class='addthis_button_tweet' tw:count='vertical'></a><a class='addthis_button_google_plusone' g:plusone:size='tall'></a><a class='addthis_counter'></a></div>"
/>
The result is something like this:
You can configure the AddThis widget in the blog post list and blog detail view separately using the correct SkinID in the theme.skin file like this (shown below with the default values):
<portal:AddThisWidget runat="server" SkinID="BlogPostDetail"
ToolbarMarkup="<div class='addthis_toolbox addthis_default_style addthis_32x32_style'><a class='addthis_button_preferred_1'></a><a class='addthis_button_preferred_2'></a><a class='addthis_button_preferred_4'></a><a class='addthis_button_compact'></a><a class='addthis_counter addthis_bubble_style'></a></div>"
/>
<portal:AddThisWidget runat="server" SkinID="BlogList"
ToolbarMarkupWithId="<div id='{0}' class='addthis_toolbox addthis_default_style addthis_32x32_style'><a class='addthis_button_preferred_1'></a><a class='addthis_button_preferred_2'></a><a class='addthis_button_preferred_4'></a><a class='addthis_button_compact'></a><a class='addthis_counter addthis_bubble_style'></a></div>"
/>
Note that the BlogList uses ToolbarMarkupWithId instead of ToolbarMarkup. The AddThis widget uses the one withId if the url to share is specified because when there are multiple instances such as in a list they each need unique ids so the {0} is replaced with an id when databinding. So make sure you keep that if you override the property to change the markup. When the url to share is not specified on the controll then it uses the url of the page it is on. Therefore with a list of blog posts where we want each instance to share the link of the post we must specify the url.
The ToolBarMarkup property allows you complete control over customization, just make sure you only use single quotes within the markup on this property.
Created by Joe Audette on Oct 11, 2012
Last Modified by Joe Audette on Dec 24, 2013