Preparing a Local Copy of mojoPortal for Deployment
Before you deploy mojoPortal to Windows Azure you should prepare the files on your local disk drive.
Get mojoPortal and Set Your Connection String for SqlAzure
1. Download the latest package of mojoPortal from Codeplex, you'll need the package mojoportal-x-x-x-x-mssql-net40-deploymentfiles.zip
2. Right click the downloaded zip file and choose Extract All. The contents of the wwwroot folder are the needed files, you can discard the other files and rename the wwwroot folder as myAzureFile or whatever you want, but should probably give it a meaningful name so that you will know what the folder is later on. When you upgrade you should deploy the upgraded files into the same folder so that you have a local copy of exactly what is deployed.
3. Rename the user.config.sample file in the root to user.config and enter the connection string for your SqlAzure database
there.
4. Rename the Web.config file to Web.mediumtrust.config, and rename the Web.fulltrust.config file to Web.config
Disable the Lucene.NET Search Index
Also add this in user.config because the built in Lucene.NET search engine does not currently work in Azure:
<add key="DisableSearchIndex" value="true"/>
You can enable Bing or Google for site search in Site Settings after your site is up and running.
Generate a Custom Machine Key
Generate a custom machine key and replace the machine key in Web.config with the one you generated. Note that when you upgrade, you'll need to make sure you copy this machine key into the new Web.config file that comes in whatever version of mojoPortal you upgrade to. Once you have established a custom machine key it should never change, if it does then you won't be able to login if using encrypted passwords because the encryption uses the machine key.
Tip: You can skip this step for now and then use mojoPortal to generate a new machine key. It just means you will need to edit and re-upload your Web.config after the site is up and running. Just don't change to encrypted password until you have configured a custom machine key.
Configure Email
Configure SMTP settings for email by adding these in user.config and editing them with settings to an smtp server that you have access to.
<add key="SMTPServer" value="localhost"/>
<add key="SMTPRequiresAuthentication" value="false"/>
<add key="SMTPUseSsl" value="false"/>
<add key="SMTPPort" value="25"/>
<add key="SMTPUser" value="UserName"/>
<add key="SMTPPassword" value="UPassword"/>
<add key="SMTPTimeoutInMilliseconds" value="30000"/>
<!-- Leave this blank for ASCII encoding. Allowed values are utf-8, utf-32, and unicode -->
<add key="SmtpPreferredEncoding" value=""/>
If you don't already have an available mail server to use, checkout ElasticMail, it is a reasonably priced service that I use on this site for forum and newsletter emails.
Configure AppFabric Caching
Configure the cache to use the AppFabric cache you created previously by adding these items in your user.config file:
<add key="Cache:ProviderType" value="AppFabricCache"/>
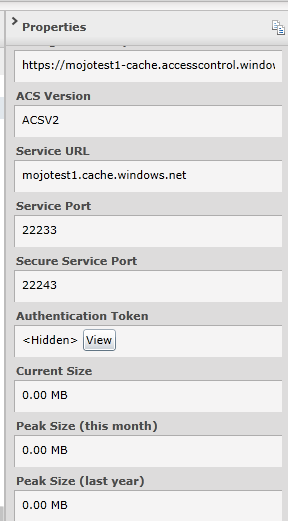
<add key="Cache:DistributedCacheName" value="mojotest1"/>
<add key="Cache:DistributedCacheServers" value="mojotest1.cache.windows.net:22243"/>
<add key="Cache:AzureCacheSecurityMode" value="Message"/>
<add key="Cache:AzureCacheUseSsl" value="true"/>
<add key="Cache:AzureCacheAuthorizationInfo" value="YWNzOmh0dHBzOi8vbW9qb3Rlc3QxLWNhY2hlLmFjY2Vzc2NvbnRyb2wud2luZG93cy5uZXQvV1JBUHYwLjkvJm93bmVyJkFNTENoNWMyMEZMNGJhRE9kWk1xeXdsTDhhL1NmRWVBanN5aG42YS8xMzA9Jmh0dHA6Ly9tb2pvdGVzdDEuY2FjaGUud2luZG93cy5uZXQ="/>
Note that "mojotest1" in the example above is the namespace, so you would replace that with your own namespace, and you would replace the AzureCacheAuthorizationInfo value with your own. Once your cache is active, you can scroll down the Properties on the right hand side of the page and click the view button next to Authentication Token.
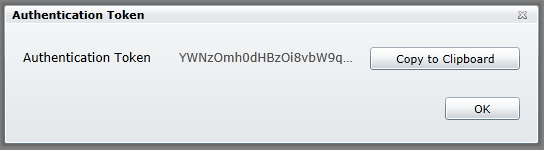
Click the "Copy to Clipboard" button then you can paste the value into the Cache:AzureCacheAuthorizationInfo setting.
Note also that I used the secure port in this setting:
<add key="Cache:DistributedCacheServers" value="mojotest1.cache.windows.net:22243"/>
and I have set this one to true:
<add key="Cache:AzureCacheUseSsl" value="true"/>
It is very important to use SSL because cached items are serialized and sent across the wire, so we want to make sure they are encrypted during transport.
Although we don't make much use of session state in mojoPortal, we might as well configure session state and web output caching to also use the AppFabric Cache. If you have any custom features that rely on session state they will need to have a shared session state so that the session variables can be access correctly no matter which web role node is handling the request.
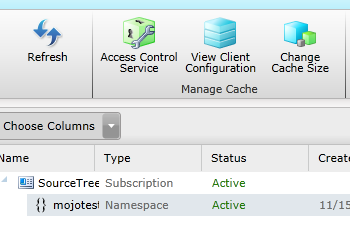
In the Windows Azure Platform Portal, click on your cahce and then click the "View Client Configuration" button in the toolbar.
This already exists in Web.config, you just need to uncomment it:
<section name="dataCacheClients" type="Microsoft.ApplicationServer.Caching.DataCacheClientsSection, Microsoft.ApplicationServer.Caching.Core"
allowLocation="true" allowDefinition="Everywhere"/>
Then right after the closing </configSections> element paste this part:
<dataCacheClient name="default">
<hosts>
<host name="mojotest1.cache.windows.net" cachePort="22233" />
</hosts>
<securityProperties mode="Message">
<messageSecurity
authorizationInfo="YWNzOmh0dHBzOi8vbW9qb3Rlc3QxLWNhY2hlLmFjY2Vzc2NvbnRyb2wud2luZG93cy5uZXQvV1JBUHYwLjkvJm93bmVyJms3KzJYK1VaSVF6NkowZzd5WHhHc2xYNWtkb1NCQXlpL0lIVEN6d21VdDg9Jmh0dHA6Ly9tb2pvdGVzdDEuY2FjaGUud2luZG93cy5uZXQ=">
</messageSecurity>
</securityProperties>
</dataCacheClient>
<dataCacheClient name="SslEndpoint">
<hosts>
<host name="mojotest1.cache.windows.net" cachePort="22243" />
</hosts>
<securityProperties mode="Message" sslEnabled="true">
<messageSecurity
authorizationInfo="YWNzOmh0dHBzOi8vbW9qb3Rlc3QxLWNhY2hlLmFjY2Vzc2NvbnRyb2wud2luZG93cy5uZXQvV1JBUHYwLjkvJm93bmVyJms3KzJYK1VaSVF6NkowZzd5WHhHc2xYNWtkb1NCQXlpL0lIVEN6d21VdDg9Jmh0dHA6Ly9tb2pvdGVzdDEuY2FjaGUud2luZG93cy5uZXQ=">
</messageSecurity>
</securityProperties>
</dataCacheClient>
</dataCacheClients>
but don't copy it from this web page copy it from your Cache Client Configuration so it has your authorizationInfo.
Finally, just before the closing </system.web> element, you will find these entries in comments, you just need to uncomment them:
<sessionState mode="Custom" customProvider="AppFabricCacheSessionStoreProvider">
<providers>
<add name="AppFabricCacheSessionStoreProvider"
type="Microsoft.Web.DistributedCache.DistributedCacheSessionStateStoreProvider, Microsoft.Web.DistributedCache"
cacheName="default"
useBlobMode="true"
dataCacheClientName="SslEndpoint" />
</providers>
</sessionState>
<caching>
<outputCache defaultProvider="DistributedCache">
<providers>
<add name="DistributedCache"
type="Microsoft.Web.DistributedCache.DistributedCacheOutputCacheProvider, Microsoft.Web.DistributedCache"
cacheName="default"
dataCacheClientName="SslEndpoint" />
</providers>
</outputCache>
</caching>
Configure NeatUpload
You'll note that we chose to use the full trust web.config file above. The only difference between the full trust and medium trust web.config files is that the full trust one has NeatUpload enabled. NeatUpload is an upload control that provides a progress bar during uploads but it doesn't work in Medium Trust hosting. However for web farm environments such as Windows Azure it does require some additional configuration steps. Basically you wan to find this in your Web.config file:
<neatUpload useHttpModule="true"
maxNormalRequestLength="4096"
maxRequestLength="2097151"
multiRequestUploadHandlerUrl="~/NeatUpload/MultiRequestUploadHandler.ashx"
maxUploadRate="300" xmlns="http://www.brettle.com/neatupload/config/2008">
</neatUpload>
and replace it with this:
<neatUpload useHttpModule="true"
maxNormalRequestLength="4096"
maxRequestLength="2097151"
defaultStateStoreProvider="sbStateStoreProvider"
decryptionKey="776E2D88CAB44CA8B99EE298AD2B6597" multiRequestUploadHandlerUrl="~/NeatUpload/MultiRequestUploadHandler.ashx" xmlns="http://www.brettle.com/neatupload/config/2008">
<providers>
<add name="sbStateStoreProvider" type="Brettle.Web.NeatUpload.SessionBasedUploadStateStoreProvider" />
<add name="FilesystemUploadStorageProvider"
type="Brettle.Web.NeatUpload.FilesystemUploadStorageProvider"
tempDirectory="App_Data" />
</providers>
</neatUpload>
Note that the decryption key is just a random Guid with the dashes removed, it would be a good idea to generate your own guid and replace that one with your own, but don't forget to remove the dashes.
Configure the mojoPortal System Log to Use the Database
Edit the log4net.config file in the root to enable logging to the database and disable logging to the file system. We don't want to log to the file system because then each web role instance will be logging to its own copy of the log file and they would all being trying to sync changes to that file in blob storage and we don't want that happening.
Also add this to user.config:
<add key="UseSystemLogInsteadOfFileLog" value="true" />
See the next step: Uploading mojoPortal Files to Azure Blob Storage
Created 2011-11-09 by Joe Audette
Modified 2011-11-29 by Joe Audette
Last Modified by Joe Audette on Nov 29, 2011