Preliminary Steps
Before you can view the site in Windows Azure, you'll have to configure your domain (generally via a domain registrar) to point to Windows Azure. Create a CNAME record that maps the host (e.g. www.example.org) to the Windows Azure application (e.g. example.cloudapp.net). Once that's done, after uplaoding the files as indicated below, you should be able to browse to the domain and see your site.
(Optional) If you want to test the configuration before you update your domain settings, you can edit the %windir%\system32\drivers\etc\hosts file on your computer to point the domain at your Windows Azure application. To do that, run ping example.cloudapp.net from a command prompt and copy the IP address that appears. Then add a line to the hosts file that says "123.123.123.123 www.example.org" (replacing 123.123.123.123 with the IP address you saw)
Uploading the Files
The final step is to copy your prepared mojoPortal files into the Blob Storage account that you created previously. You'll need a tool to copy files in and out of Windows Azure Blob Storage. One free tool that is available for accessing blob storage is ClumsyLeaf CloudXplorer. You can think of this tool much like an FTP client that you would use to upload files in typical shared hosting environments.
You'll configure the tool with your storage account and then you can browse the blob storage very much like browsing a file system.
1. In CloudXplorer click File > Accounts.., then click "New" Windows Azure Storage Account
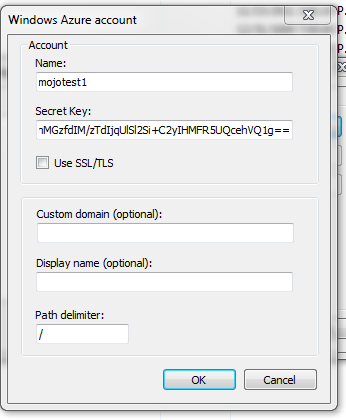
2. After configuring your account it will appear in the left pane and it will have a top level container named sites. Click on the sites container in the left pane, then right click the middle pane and choose New > Folder.
Create a folder named after the host name of your site. For example if your site is www.yourdomain.com then create a folder named www.yourdomain.com, this will be the root folder of the site. Note that you can have multiple site installations if you want to, you would create folder for the host name of each site.
It will take a while to upload all of the files, so it is best to avoid the site running until all the files have been uploaded. So the first thing we should do is upload an html file name app_offline.htm into the root of the site. This will prevent it from running, once all of the files are uploaded simply delete this file. You should do the same thing later on when you upgrade mojoPortal to a new version.
I recommend first copying the /Setup folder from the prepared mojoPortal files into blob storage, then the /ClientScript folder, then the /Data folder, and then the remaining folders and files. Again this makes sure all of our setup files are in place before the setup page is executed.
Once all of the files have been uploaded, delete the app_offline.htm file from the root of your site, then browse to your site host name, it should automatically redirect to /Setup/Default.aspx, but if not then you can navigate to that url directly. The setup page will run the database scripts and other configuration steps.
Created 2011-11-16 by Joe Audette